
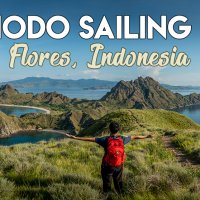
When I first decided to go to Torres del Paine, I was surprised by the number of blogs searchable on the Internet. They were plenty of information that I could find, but none of them was the information that I was looking for. First of all, I did not want to hike the famous O/W/Q treks (I definitely want to do it, but due to time and weather constraints we had to drop that plan). Most of the blog posts that I found were related to those treks — they’re excellent but they were not something I looked for. Second of all, we went to Chile during the shoulder month of September, while most blogs are about summer visits. Third of all, we wanted to rent a car and explore the national park by car. Is it expensive? How feasible is it? Such information was pretty hard to come by.
That is why I decided to write this post. This blog post is dedicated to those who want to visit Torres del Paine, but do not want to do the multi-day hikes. It is also an itinerary with family-friendly in mind, as I was travelling with a family friend (4 adults + 1 kid). This is also written for those who want to do Torres del Paine on a budget by renting a car and visiting places at your own pace (as opposed to taking day tours!).
This itinerary is completely customizable according to your needs and plans. Do check out our vlogs, some optional activities you can do in Torres del Paine, some tips on visiting this beautiful park, and how much we spent on this trip.
- Day 1 – Punta Arenas & Puerto Natales
- Day 2 – Lago Tyndall & Grey Glacier
- Day 3 – Day hike to the Base of the Towers
- Day 4 – Explore the national park by car
- Day 5 – Puerto Natales & Punta Arenas
- Day 6 – Punta Arenas & back to Santiago
- Optional Activities
- Useful Tips
- Budget Breakdowns
- Our Vlogs
Day 1 – Punta Arenas & Puerto Natales
Chile is a ridiculously long country, which means that the country is very diverse in terms of nature and landscape. But that makes it practically impossible to travel from north to south by land in one day. That’s the reason why a lot of visitors prefer flying rather than taking multiple bus rides from the capital city of Santiago to the southern part of the country.
Punta Arenas is your gateway to the south of Chile. It is the capital city of Chile’s southernmost region, Magallanes and Antartica Chilena. It is also the only city in the south closest to Chile’s Patagonia that is served with an airport. Flying from Santiago to Punta Arenas takes about 4 hours. A few airlines fly to the city on a daily basis, including LATAM, Jetsmart, and Sky Airline. See the budget breakdown below to figure out how much we spent on the ticket.
Unfortunately, Torres del Paine itself is not exactly near Punta Arenas. You have to catch a 3-hour bus journey costing CLP 14,000/person return to the small city of Puerto Natales. The good thing is that the bus takes you straight from the airport to the bus terminal of Puerto Natales. So there is no need to go to the city centre once you land in Punta Arenas’ Presidente Carlos Ibáñez del Campo International Airport.
Puerto Natales is a small port city where people stock up on groceries and foods before they enter Torres del Paine. It was also the place where we rented and picked up our car, which we booked about a few weeks before we arrived. It is always possible to go the park on the same day once you get the car (especially if you go in the summer when daylight is longer), but we decided to explore the town for a few hours and stay for a night in Puerto Natales.
Day 2 – Lago Tyndall & Grey Glacier
We set off for Torres del Paine early in the morning, by following route number 9 and then to the smaller untarred Y-290 road. Depending on your driving skills on an untarred dusty road, it should not take more than 2 hours to reach the visitor centre of the park where the entrance ticket is sold. You will pass through the Mylodon Cave Natural Monument on your right, which could be an option to stop over. The monument is famously known for its cave where the remains of an extinct ground sloth, named Mylodon were discovered. We decided not to stop here as the reviews on TripAdvisor were not that impressive. On top of that, foreigners need to pay an entrance fee of CLP 5,000 (or USD 9). Not exactly cheap for a mediocre place.
 For our stay in Torres del Paine, we booked a 4-bedroom cabin at the Cabañas Lago Tyndall (Booking.com | Agoda), which is located just outside of the southern entrance to the park — the Serrano entrance to be specific, near the Tyndall Lake. At that time, it was the cheapest accommodation we could find around the area of Torres del Paine. We couldn’t be happier to stay here as the view was really amazing. We decided to check in early and drop our bags here to gauge the distance from the entrance to our cabin.
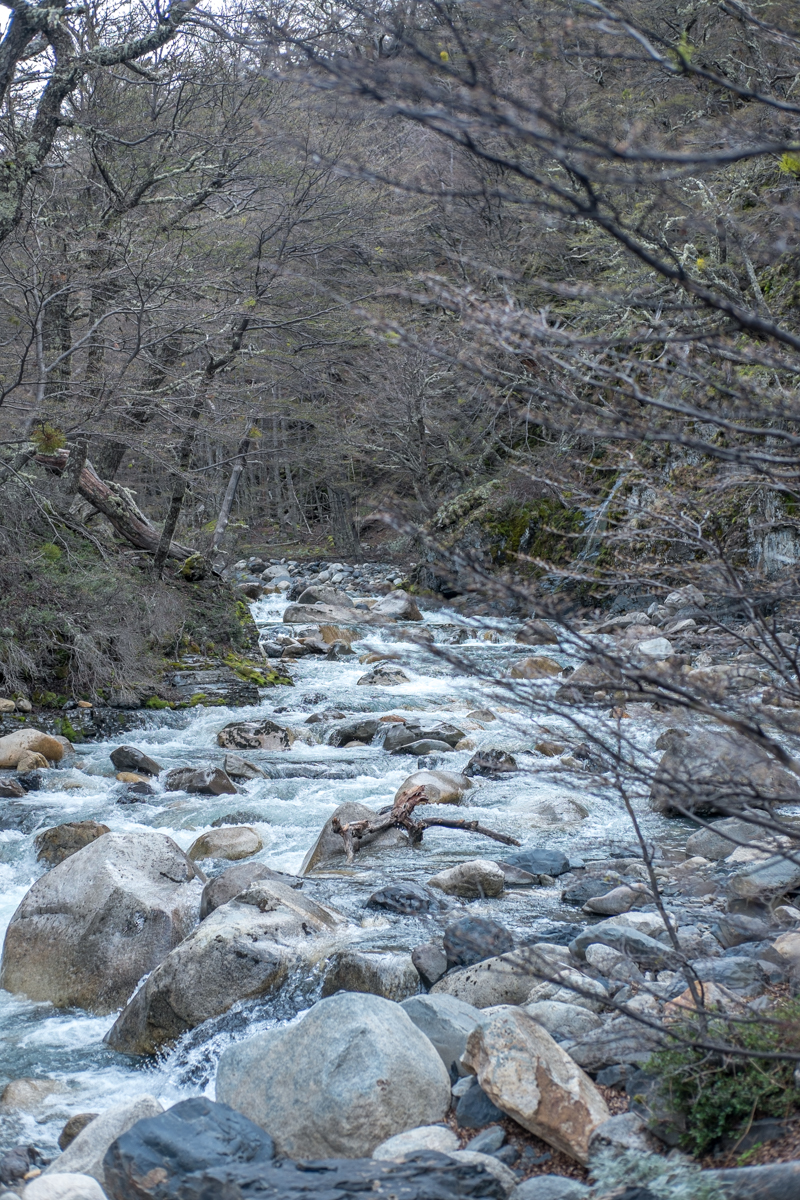
Grey Lake/Glacier is our first stop for Torres del Paine, which is about 25 km (30 minutes or so) from our cabin at Lago Tyndall. Before going to the lake, we had to buy a 3-day pass ticket of CLP 11,000/person at the visitor centre of the Torres del Paine National Park. You won’t be able to miss this centre as it is very visibly marked. There are a number of passes available depending on how long you are planning to explore the park.
The view along the road to the Grey Lake was AMAZING (if you are lucky & the sky is clear). We were completely amazed by those rocky mountains. It was simply a breathtaking landscape!
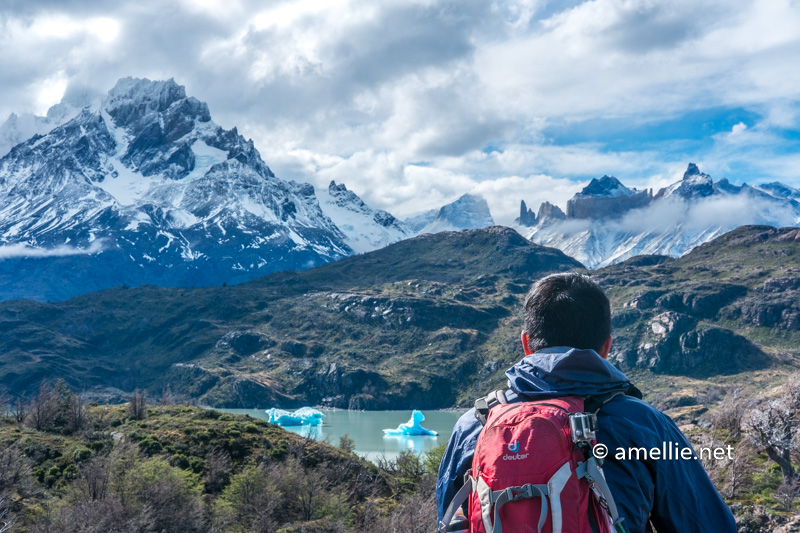
If you are keen to see the Grey Glacier from a boat, it is possible to hop on a 3-to-4-hour boat tour, which costs CLP 78,000 per person (USD 130). Unfortunately, the price was too expensive for us, so my husband and I decided to do a short hike to the Mirador Lago Grey.
The Mirador Lago Grey (or Lago Grey Lookout) was an easy one hour hike (one-way) with a beautiful view of the Torres mountains, Grey Lake, and a tiny part of Grey Glacier from afar. The view was worth it, though and it was FREE!

And here’s our vlog doing the short hike to the lookout 🙂
If you have the time and energy, do try hiking the Ferrier Lookout, which I wrote in more detail below. Since we were travelling with our friends, we decided to take it easy this time and to go back to our cabin to have a late lunch and chill.
Day 3 – Day hike to the Base of the Towers
We decided to do a full day hike to the Base of Towers on our third day. If you are not keen on doing a full day hiking, you can explore the national park by car (see Day 4 below). Also, do check out some optional activities that I’ve compiled below.
To me, going to Torres del Paine without attempting to hike to the Base of the Towers is quite a miss. I just HAVE to do it once I am here! When will I be able to visit this beautiful country again? Probably never. So that’s exactly what we did — hike to the Base of the Towers (Mirador Base de Las Torres). I was quite nervous that the trail would be closed due to bad weather, but thankfully, the sky was clear on the day we wanted to hike. So, before you go, make sure you check with the ranger if the trail is open or not.
We started our journey from our cabin at around 4 AM. It was a long 2-hour drive towards the entrance to the trek near the Las Torres Hotel. But I have to say that the view along that 53 km road was jaw-dropping. As we drove halfway towards the hotel, the mountain range that we saw in Lago Grey the day before appeared in front of us in a much bigger size like an oil painting. As the sun rose, the tip of the snowy mountains was coloured with orange sun rays, making the view even more dramatic! We could not resist but to stop near Pehoé Lake to enjoy the most beautiful landscape we had ever seen in our lives!
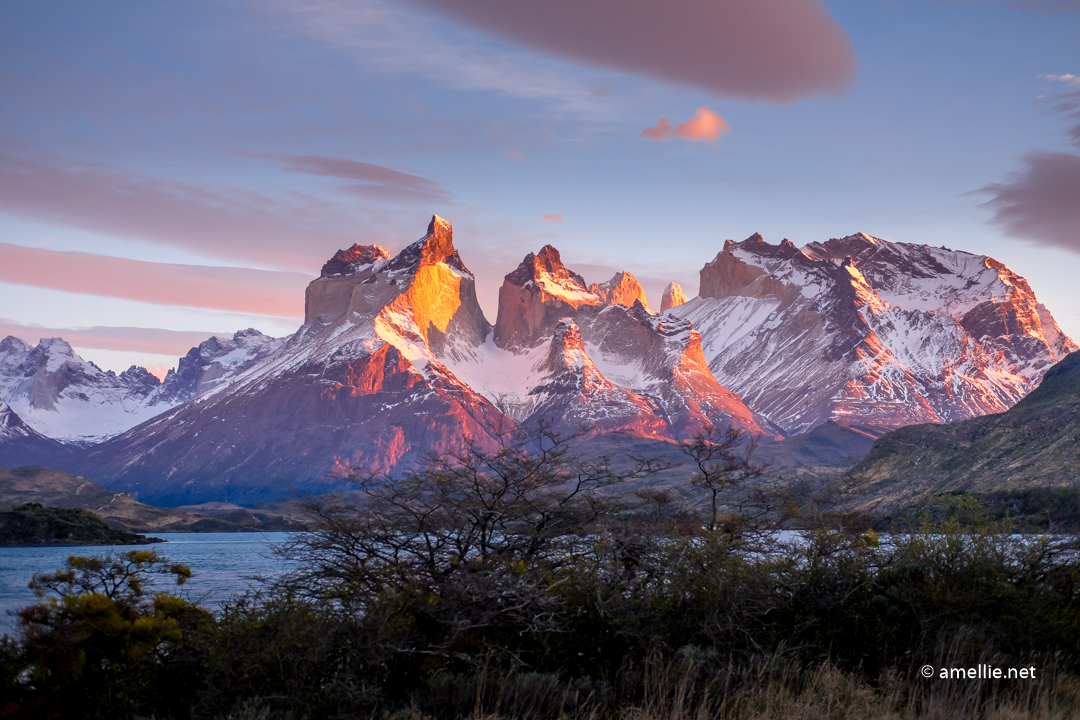
Unfortunately, we could not really enjoy the view for much longer as we had to rush to the trailhead. I regretted doing that though, coz we could not see the same view the next day 🙁 everything was covered with clouds! So if you happen to see a clear view, just head to Pehoé Lake and you’ll be spoilt with such view!

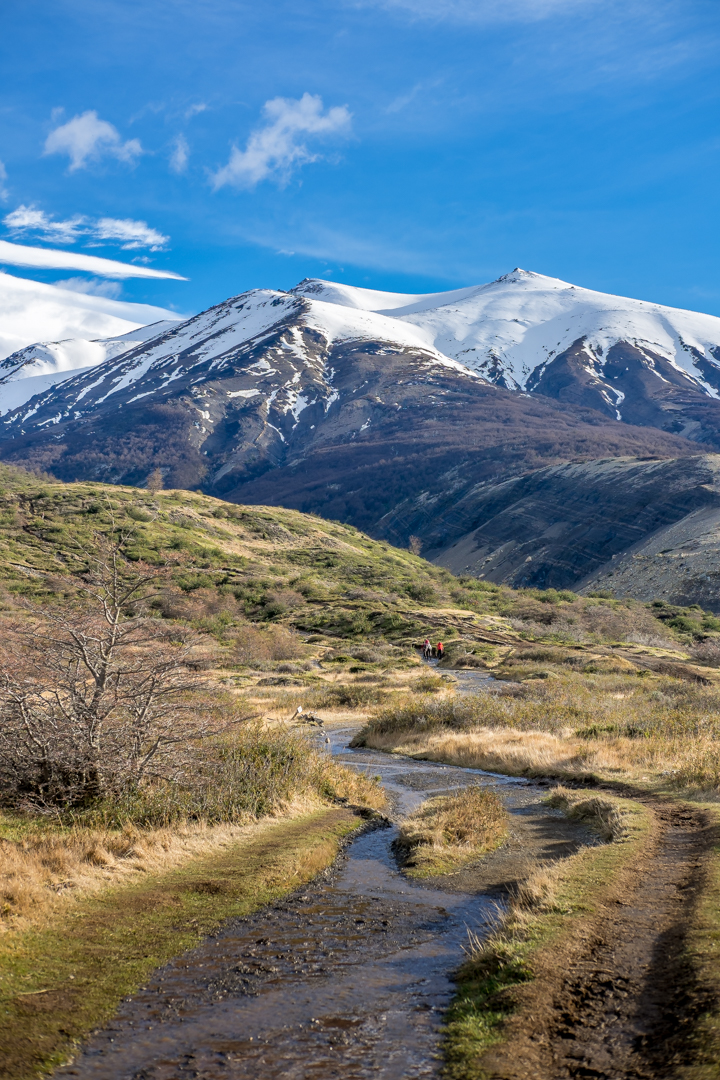
We parked the car at the entrance of the trailhead and started the hike around 9 AM. The hike itself was not too hard. We only faced some challenges as we got closer to the top due to strong wind and slippery snowy trail.
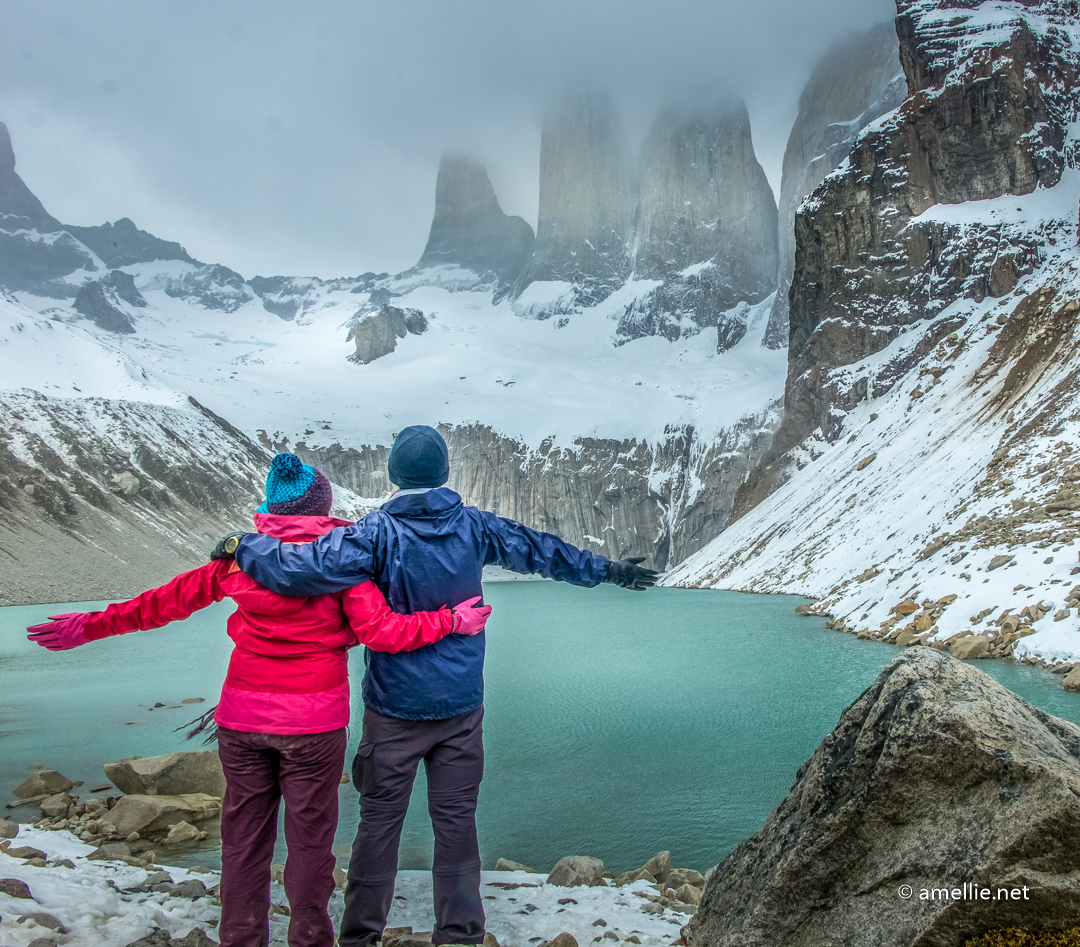
After about 4 hours, we reached the Base of the Towers! It started to snow and the wind pushed the clouds into the towers, covering them. Thankfully we could still see a glimpse of them! I heard so many stories of people hiking here only to find the towers completely covered with clouds. I am so glad I could at least see the towers from the base! I can finally tick that bucket list of mine 🙂
We started going down at 2 PM and came back to the carpark by 6 PM. It was quite scary to drive when everything was completely dark. Thankfully, we managed to reach our cabin for dinner.
Day 4 – Explore the national park by car
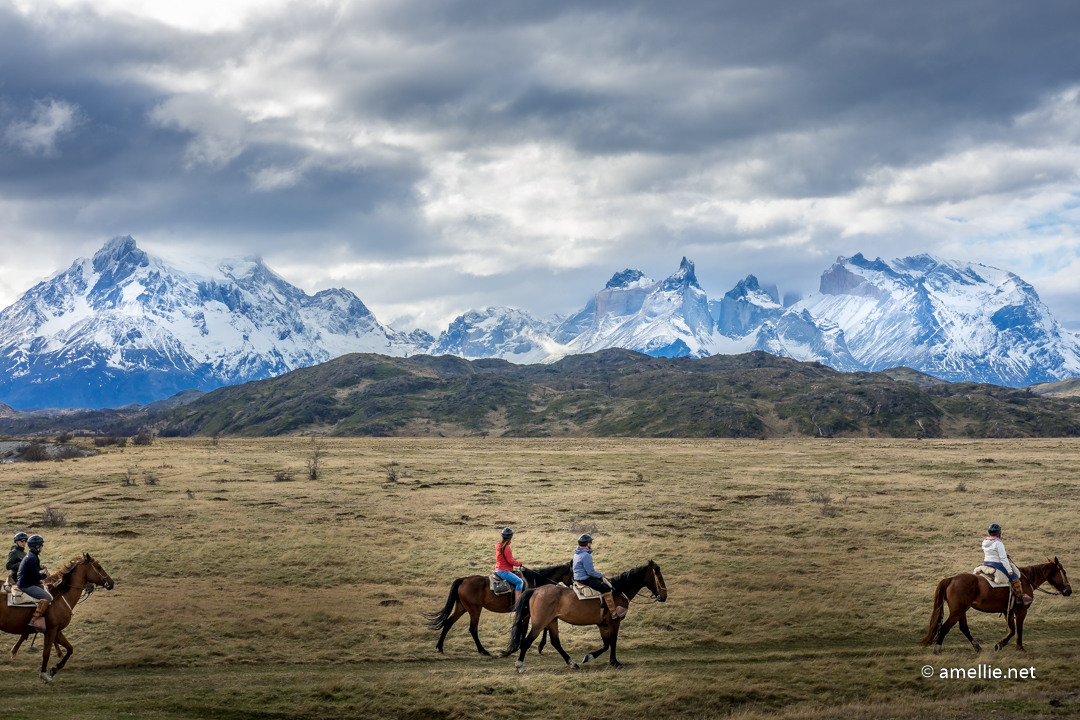
Exploring the national park by car and occasionally stopping at some points of interests to take pictures was one of the most enjoyable activities we do here in Torres del Paine, especially if you are bringing your children. The landscape is just so magnificent and we couldn’t stop admiring this park. These points of interests are equipped with plenty of proper car parks so you will be able to leave the car in peace.
 Our first stop was the Pehoé Lookout located near the Pehoé Hostel. I am not sure how many times I am gonna say it in this post, but the Pehoé Lake has the most magnificent and beautiful landscape I’ve ever seen in the entire Torres del Paine National Park! Unfortunately though, when the sky is not clear, the whole mountains are covered with clouds so you won’t be able to see how amazing this place is. We were not able to see the same view as when we were there the previous day and that was quite a shame! We would probably be doing the Condor Lookout and Cuernos Lookout if the sky was clear that day.
Don’t forget to stop at the Nordenskjöld Lake Lookout which is a few minutes away from the Salto Grande Lookout. This is another epic view of the Torres mountains and you will be able to go down to the lake itself.
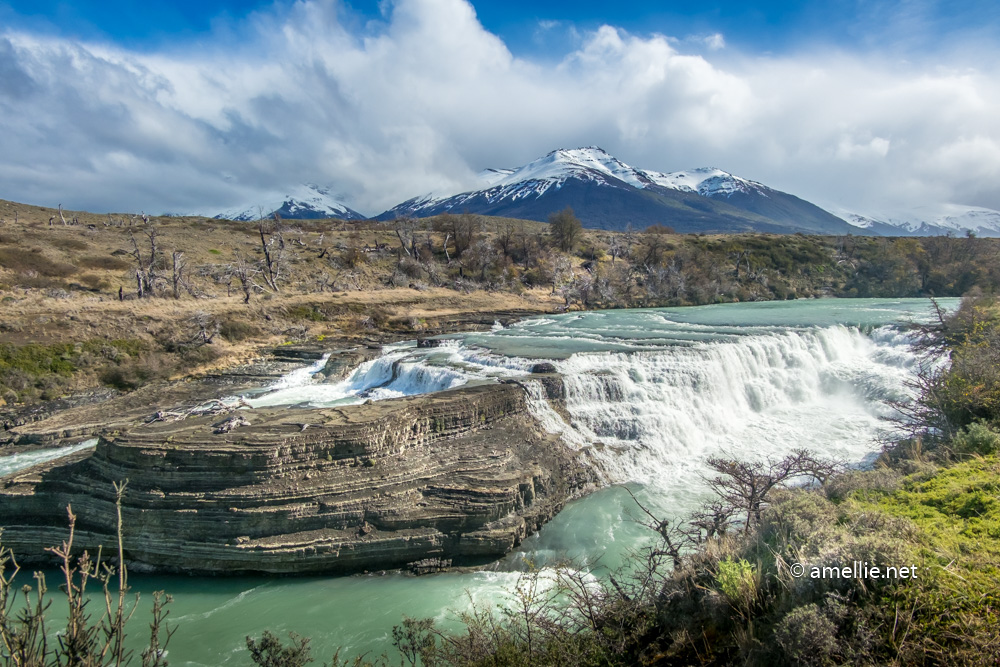
Paine Waterfall was pretty amazing, especially for someone who has never seen Niagara Falls before. I did wish that the weather turned slightly better — otherwise, we would be able to see the whole mountains in the background.
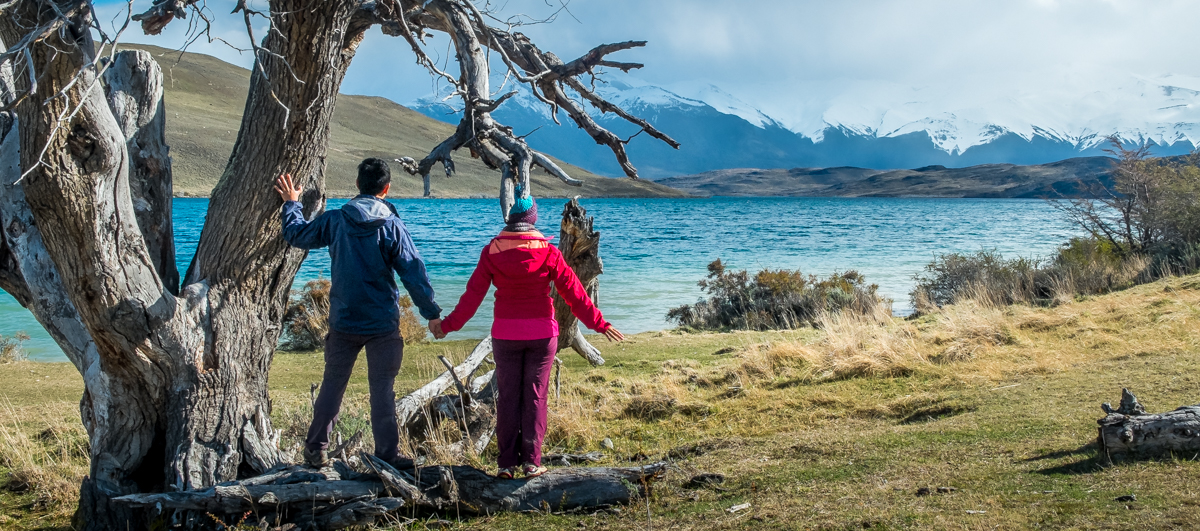
Laguna Azul (aka the Blue Lake) is definitely a must visit. Just how beautiful this place is?!

After Laguna Azul, we went back to Puerto Natales via route Y-160 in the northeast of the park. If I have the chance to do this trip again, I would definitely stay one more night in the park, perhaps somewhere near the Pehoé Lake.
Day 5 – Puerto Natales & Punta Arenas
We decided to extend our car rental and headed for the border of Argentina. Well, unfortunately, I needed a visa in advance to go to Argentina (with is only less than 30 minutes away from Puerto Natales) so we just took pictures at the border. But going to the Argentinian side of Patagonia is possible, provided that you pay extra fees for the car rental (not really sure for what…?)
Nothing much to do in Puerto Natales in general, so we just chilled and relaxed. That’s why I regretted not staying a night longer in Torres del Paine!
Eventually, we said goodbye to Puerto Natales and took the bus to Punta Arenas in the afternoon.
Day 6 – Punta Arenas & back to Santiago
Unfortunately, the penguin “season” in Magdalena Island is only between the months of October and April, so we were not able to make it. Make sure to check the exact dates on the following tour operators’ website if you want to see the penguins: Solo Expediciones, Patagonia Adventures, and Comapa. You can even book in advance for those tours.
Since there were no penguins, we stayed in the city and explored tiny bits of Punta Arenas. We went to Cerro de La Cruz to see the view of this small city and tried out some local foods at La Marmita.
I did regret spending unproductive time in this city as I was so mesmerized by Torres del Paine that it was so hard to admire other places in this country.
Optional Activities
Besides the Base of the Towers day hike, there are a number of short hikes around the Torres del Paine National Park that you can do. Here are some of them. I didn’t manage to go to any of them due to the short time.
Condor Lookout
One thing I didn’t do (and regretted not doing) is hiking the Condor Lookout. The lookout can be reached by walking less than an hour (one way) from the Pehoé camping zone. From here, you will be able to see one of the most epic views of the park: the mountains and the turquoise lake of Pehoé. This is something I would like to do in the future when I visit Torres del Paine again (oh yes I wish!!).
Cuernos Lookout
The Cuernos Lookout is another epic 2-3 hours hike, offering beautiful views of Los Cuernos, or “The Horns” and Salto Grande Waterfall. The lookout can be reached from the Salto Graden lookout, a few minutes drive away from Pehoe Lookout.
Laguna Azul Hike
I read somewhere that the 4-5 hours (return) Laguna Azul hike to the Sierra Masle Lookout and Cebolla Lagoon is quite relaxing. It is suitable for families with children. Unfortunately, we were not able to attempt the hike as we had to go back to Puerto Natales on that day.
Ferrier Lookout
The Ferrier Lookout trail is not for beginners or family as it is very steep, but it offers a great view of the Lake Grey, Glacier Grey and the mountains of Torres del Paine. It takes two hours to reach the top. The start of the trail is located next to the parking lot for the Glacier Grey boat tour.
Useful Tips
How to go there
Puerto Natales is your first gateway to the south of Chile. The city can be reached by a 4-hour flight from Santiago. It is possible to take a combination of bus and ferry, but it takes about 2 days to reach the destination and in my opinion, it’s not worth to travel this way.
Once you are in Puerto Natales, you will need to take a bus to Punta Arenas. There are two bus companies providing services between Puerto Natales and Punta Arenas: Bus Sur and Buses Fernandez. It is better to buy bus tickets way in advance online to prevent disappointments. However, there is always a possibility to buy them on the spot. These buses either depart from the airport or the city of Puerto Natales to the Punta Arenas’ bus station.
Renting a car
Having a car provided us with flexibility in terms of time and the places we wanted to explore. Taking day tours is expensive and after figuring out how much we could possibly save by renting a car and the limited time we had, we knew straight away that this would be the best option for us.
There are a few rental companies available in Puerto Natales (I put two of them below). We decided to go with Emsa/Avis as they were the only one available at the time. The renting cost was not as bad as we thought: CLP 50,700 (USD 167) per day. Since there were 4 of us, we could split the cost equally 🙂
Emsa Rent A Car Avis SublicenciaWebsite: Avis.com
Phone: +56 61 261 4388 Europcar Puerto Natales
Website: Europcar.com
Phone: +56 61 241 4475
 Road conditions around the Torres del Paine National Park are not the best. The roads are not tarred, so you are forced to drive hitting some pebbles and rocks on the way. Driving at night is challenging and dangerous as the road is completely dark with no lights. Strong winds around the park also make your driving experience even more challenging.
With these things in mind, I do think that renting a 4WD makes perfect sense, due to the road conditions and safety. But we did not manage to get a 4WD as they were all taken so we took a sedan instead. As safety precautions, always check your car’s tires every time you are about to start driving. Be mindful of any liquids leaking from the car, as the rocks could hit the fuel tank anytime.
Where to stay
Puerto Natales
Although Puerto Natales is a very small city, it has a lot of hotels, refugios, and hostels for the tourists who are making a stopover before they head for Patagonia.
On our first day here, we stayed at Refugio Hoshken in Puerto Natales (Booking.com | Agoda). It was probably one of the cheapest accommodation in the city, but it was very basic with small rooms and slightly run down albeit clean.
Our family friends, though, stayed at The Singing Lamb and I have to say that this was probably one of the best places to stay in Puerto Natales. Huge common area, well-equipped kitchens, well-maintained and clean… everything looks great! They were very happy staying at this accommodation, so it is definitely worth checking out.
Torres del Paine
Choosing an accommodation slightly outside of the park could cut the cost by half and that was the reason why we stayed at Cabañas Lago Tyndall (Booking.com | Agoda). I saw some bad reviews about its restaurant foods so I think the best way to enjoy your stay here is to cook your own meals (it’s cheaper to cook too!). The cabin is well-equipped with cooking utensils and they can even provide you with salts and other necessities. It also has a beautiful view of the Torres. There are some other hotels located in the area that you can consider, namely Hotel Río Serrano (Booking.com | Agoda), Hosteria Lago del Toro (Booking.com | Agoda), and Refugio Darwin (Booking.com | Agoda).
Although Lago Tyndall is not too far from the attractions in the national park, mainly Lago Grey, Toro Lake, and Pehoé Lake, the cabin is located 2 hours away from the trailhead of the towers and it takes even longer to Laguna Azul. If the distance is your main concern, then you can either stay for a night here to visit closer attractions and then move into a hotel inside the park the next day or two.
It is also possible to camp in a designated camping area outside of the winter months. Some of the camping areas are accessible by car and this could be a good option if you want to save money. Camping Río Serrano, Camping Pehoé, and Refugio Torre Central are the camping grounds around the Torres del Paine National Park that are accessible by car. If you are looking for a great view, Camping Pehoé has the best view compared to the other two camping grounds. Refugio Torre Central is more expensive, but it is located at the start of the trailhead to the Base of the Towers. Although you will be able to see the front face of the towers, the view around this refugio is not as epic compared to the one in Pehoé.
If you are willing to pay more though, look no further than the accommodation around Lake Pehoé. Hosteria Pehoe would be the best choice as it has the best view in Torres del Paine (albeit a mediocre hotel). Explora Patagonia (Booking.com | Agoda) is another pricier option for a hotel located in the area of Lake Pehoé.
If Lake Pehoé is not your cup of tea (but seriously it’s so damn beautiful!) and you prefer staying nearby the trailhead of the towers, then Hotel Las Torres (Booking.com | Agoda) is quite decent. Staying at Refugio Torre Central, which is located within a walking distance to the hotel, could be cheaper, so it is best to compare the rates between the two.
Punta Arenas
We stayed for a night in Punta Arenas at Hostal Rynaike (Booking.com | Agoda). This hotel is conveniently located near the Cerro de La Cruz, a small hill where you will be able to see the view of the city. The hotel is well-maintained and very clean, despite us having to share the bathroom. It also has a well-equipped kitchen, where we can occasionally cook our meals. The owner is also very friendly and we enjoyed our stay here.
When to go
Many people prefer to go to Torres del Paine during the summer months of December to early March — those are the high season; the busiest time of the year, making the price of accommodation goes up. I personally prefer places with fewer crowds, so visiting the park at the end of September (or anytime other than the summer season) was definitely more pleasant. However, if you are planning to do one of the multi-day treks, most of the camping places and refugios along the trek trails are closed during winter time until October. So it’s best to avoid winter months (June-September). I would recommend reading this informative article for more information on the seasons.
If you visit during the Chilean Independence Day aka Dieciocho, then I would recommend booking everything in advance. While most Chileans prefer to go to the Atacama Desert in the north and only a few of them go to the south due to the cold weather, we still booked the car, buses, and accommodation in advance. Buses did run less frequent as usual due to the public holiday and we did not want to risk ruining our trip due to sold out tickets.
We were also worried that there were no supermarkets or shops opened during the Dieciocho, as most Chileans told us that “everything” would be closed on that week. We ended up buying our groceries in Santiago before we flew to the south. But it turned out, some shops & supermarkets in Puerto Natales still opened on that day so it was still possible to buy foods in Puerto Natales.
How many days
I would suggest staying a minimum of 6 days (including travelling from/to Punta Arenas), out of which 4 days are spent in Torres del Paine itself. If you can stay longer, that is even better because I regret not staying for 4 days or more in the park itself (I should have skipped Punta Arenas!)! If you have more time and budget, why not stay longer?
Budget Breakdowns
How much did we spend in total? Well, Chile is not exactly a cheap country, but we managed to save quite a bit of money by sharing car rentals, petrol, food, and accommodation in Torres del Paine with our friends. Travelling during off-season also had some advantages; most of the accommodations we stayed offered huge discounts. In total, we spent about CLP 61,000 (USD 1,000) per person for the whole 6 days.
Below are the breakdowns of the things we spent. Some of the prices here are added for reference only. Do note that Chilean pesos are fluctuating, so the rates in CLP below are based on the rate at the time of writing this post and they could increase in no time. Perhaps you should stick with USD when trying to estimate your budget for this trip.
- Transportation
- Flight to Puerto Natales return: CLP 91,000 (USD 150) per person
- Bus to Punta Arenas return: CLP 14,000 (USD 23) per person
- Car rental (with Emsa/Avis): CLP 50,700 (USD 167) per day + 1 day of extension for CLP 50,000 per day
- Petrol: CLP 34,000 (USD 56) for 4 days
- Accommodation
- Refugio Hoshken in Puerto Natales (Booking.com | Agoda): CLP 21,301 (USD 35) for a double room with a shared bathroom
- The Singing Lamb in Puerto Natales (Booking.com | Agoda): CLP 27,387 (USD 45) for a double room with a private bathroom
- Smile Patagonia in Puerto Natales (Booking.com | Agoda): CLP 30,300 (USD 50) for a double room including breakfast
- Cabañas Lago Tyndall (Booking.com | Agoda): CLP 77,667 (USD 128) per night for a cabin with 2 twin rooms, a bathroom, a kitchen, and a living room
- Hostal Rynaike in Punta Arenas (Booking.com | Agoda): CLP 25,000 (USD 40) for a double room with a shared bathroom
- Attractions
- Entrance to Patagonia: CLP 11,000 (USD 18) per person
- Grey Glacier Boat our: CLP 78,000 (USD 130) per person
- Food/Meals
- Groceries to cook our own meals: CLP 80,000 (USD 132) for around 10 meals (4 adults + 1 kid)
- Eating out & snacks: CLP 76,000 (USD 125) per person. We only ate 5 times in a restaurant averaging CLP 20,000 to 30,000 per meal
Our Vlogs
Here are our vlogs in Torres del Paine. Do subscribe to my husband’s channel for more travel contents 😉
Love this blog post? Pin it!
Click on the image below to pin this blog.


12 Responses
Brilliant blog, all the information I have been looking for in one place!!! Wish I came across this sooner, well done and thank you! 🙂
Thank you for stopping by! 🙂 I hope it’s useful for planning your trip!
Very helful information. Written to some of the hotels and got spanish reply.
Wow, that’s great to know you can still enjoy Torres del Paine without having to do a multiday hike. I think right now we’d want to do the multi day hikes but that could change or if our family were to come with us we would have to find an alternative! Thanks for sharing all this valuable information! Makes visiting less intimidating as well!
What a great guide! I am trying to figure out the details of travelling solo here. You mentioned that you stayed right outside the park but to my understanding from other blogs I need to book accommodation in advance in the park order to hike in Torres del Paine? I was hoping that I could just come to do day hikes and then go back to Puerto Natales, is that possible? Thank you!
Hi Tiana! Sorry for the late reply as I was travelling. We stayed outside of the border of the Torres del Paine National Park. It took us about 2 hours by car to reach the entrance of the Torres del Paine hike. If you are not planning to rent a car, then I’d advise staying somewhere in the park, near the start of the trail.
The park is so huge. It’s impossible for you to do the hike and come back on the same day (unless you drive from Puerto Natales at 3 AM perhaps? :D) but I’d not recommend you doing that.
Great guide Amalia!
I have heard that there are no gas stations there. Was that a problem for you? How did you manage?
thanks,
-Karan
Hi Karan. Sorry for the late reply. I guess I may have forgotten to mention it in the post. We didn’t have to fill petrol during our stay so we had no problem with it.
This has been a great article, thanks for sharing your trip. We are looking to take our young kids next year
hi great article! i would like to stay 4 nights in the park. is there one central location we should stay, or move around? also if i am renting a car from puerto natales and spend 4 days in the park and then return to puerto natales, will i be able to do all that on one tank of gas?
thank you !
Hello there. It really depends what you wanna do and where u want to go. I believe I’ve written the tips on choosing accommodation in this post. Please have a read. I did this trip for 4 days with one tank of gas
4tb8xc